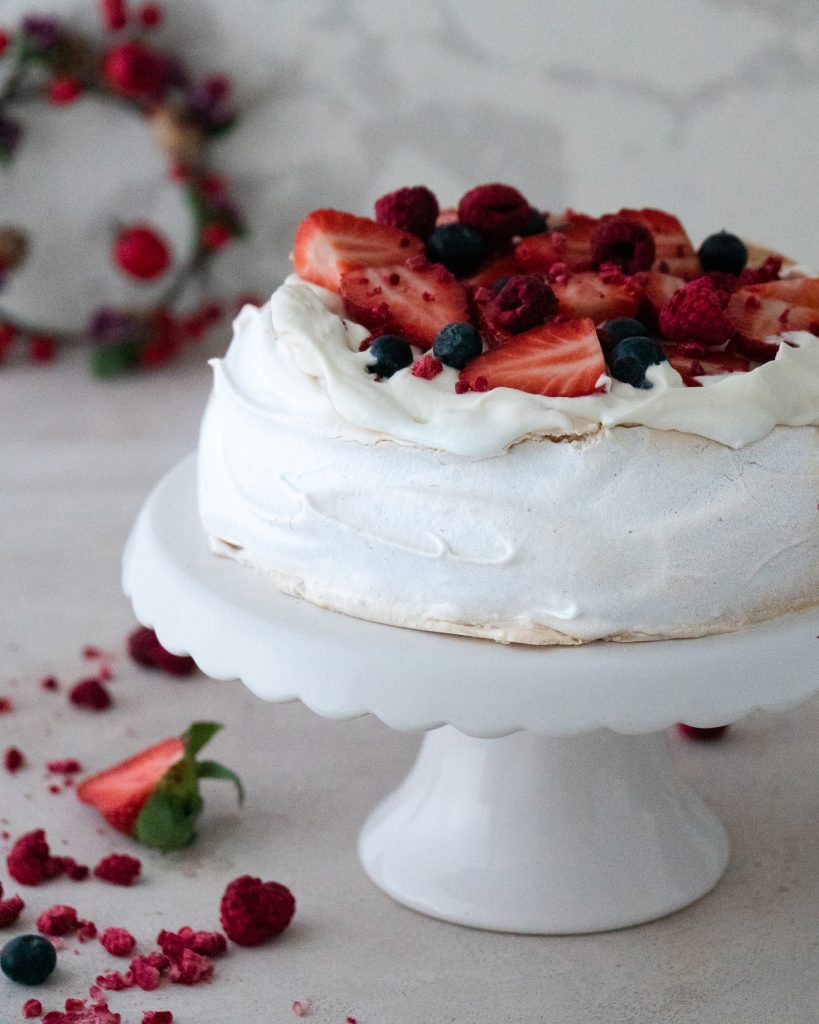
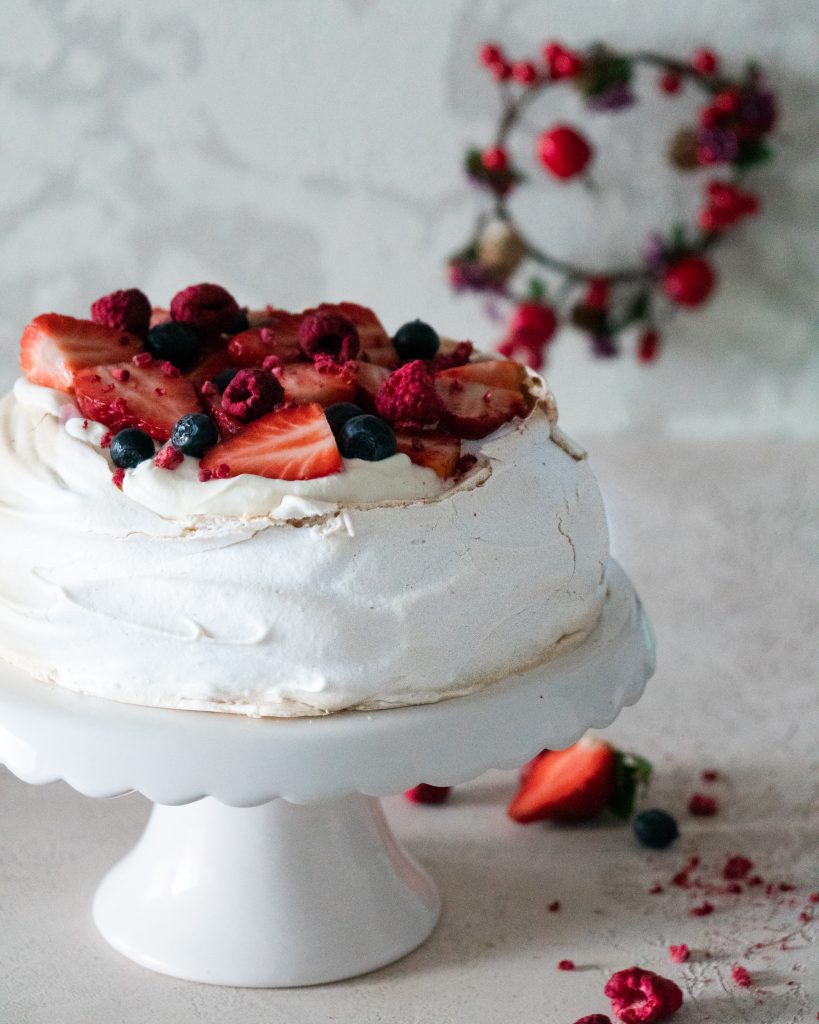
Heat the oven to 150 degrees. Place baking paper on the baking sheet and form a 20 cm circle in the center with a rolling pin. You can use the bottom of the cake baking tray as a sample. Turn the baking paper over and set aside. In a large bowl, beat the egg whites with a pinch of salt on medium speed until stiff peaks form. When the tops are formed, gradually add the sugar, mixing constantly on medium speed. Use a hand mixer, as it allows you to better adjust the movements over the entire surface of the bowl. Add white wine vinegar, cornstarch, vanilla extract and beat at low speed until all ingredients are combined. Spread the prepared meringue inside the circle, spoon by spoonful, in the middle of the circle. When all the mass is used, spread the meringue to the edges of the circle and make a well in the middle, where we will later add the cream and fruit. Place the Pavlova cake in the preheated oven on the lower guide, reduce the temperature to 130 degrees and bake for approx. 20 minutes, then lower the temperature to 110 degrees and bake for another 55 minutes. (Each oven is a little different, so keep an eye on the cake and reduce the intensity if you notice it browning in any way). When the cake is baked, turn off the heat and let it cool completely in the oven (at least 4 hours). Whip the sweet cream, add powdered sugar to it and cut the strawberries. Spread the cream over the cake and decorate with fruit. Egg whites should be at room temperature! If you keep them in the fridge, take the eggs out the night before. Use a clean and dry bowl for whipping. When the cake is baked, be careful how you move it, because it is very fragile and can crack quickly. The cake can be kept covered at room temperature for another two days.Ingredients
Instructions
Notes
Preheat oven to 200 degrees. Grease the muffin tin with some coconut fat. Strain the flour into a large bowl and mix it together with the baking powder, salt and cocoa. Set the bowl aside. In a separate bowl, mix together the eggs and sugar and stir until the mass becomes fluffy, that is, about 5-8 minutes. Gradually add almond milk, coconut oil, vanilla paste, mashed banana and peanut butter to the mixture and stir until the ingredients get well combined. Add the dry ingredients to the wet ones and mix until smooth - the mass will be a bit thick. Place the mass into muffin tins by filling each one to about 2/3 full. Sprinkle chocolate drops over the top. To create a peanut butter swirl, pour a little peanut butter on top of the muffin and use a toothpick to create swirls of any shape. Bake for 15-20 minutes or until no mass remains on the toothpick when inserted into the core of the muffin. Once the muffins are baked, leave them in the muffin tin for a few minutes to cool. Bon Appetit!Ingredients
Instructions
Yeast In a small bowl, grind the yeast, add three tablespoons of lukewarm milk, 1.5 tablespoons of flour and 1 teaspoon of sugar, mix well and leave covered for about 10-15 minutes for the yeast to form. Dough Separate the egg yolks and whites. Put the egg whites aside because you will be needing them for the filling. Gradually mix the yolks into the warm milk. Sift the flour into a large bowl and salt it along the edge. In the middle of the flour, dig a hole in the bowl with your fingers, pour in the fermented yeast and the mixture of milk and eggs. Using an electric robot, knead the dough and gradually add the melted butter while mixing. Knead the dough until it becomes smooth and separates from the bowl. Knead the kneaded dough lightly with hands, cover it with a dry cloth and let it rest in a warm place (when the dough rises, make sure that there are no open windows!). Leave to rise for about an hour for the dough to double. Then take it out of the bowl and knead it well again, shape it into a ball, cover and let it rise for another 45 minutes. Chocolate filling Meanwhile, start preparing the chocolate filling. Melt the butter in a pan over medium heat and mix it with the flour using a mixing whisk. Gradually add the flour and prevent the lumps to form by stirring it constantly. Gradually add salt, vanilla sugar and milk. Finally, add chocolate powder and sugar and mix until completely thickened. When the mass has cooled, stir in the whipped egg whites with a spatula. If the mass is not thick enough, add a little more flour (the mass should not be too liquid, because it run out of the potica when rolling). Potica rolling Cut the risen dough in half and roll each half into a rectangle about 0.5 cm thick and fill it with chocolate filling. Then roll it tightly into a roll, place in a greased baking pan and cover with a dry cloth. Let it rise for another half hour. Before putting it in the oven, pierce it several times, to the bottom, with a toothpick. Bake for 50 minutes at 180 degrees. The potica is baked when its crust becomes crispy and gets a nice brown color. When the potica is baked, coat it with hot butter and leave it to cool.Ingredients
Instructions
Biscuit: Separate the egg whites from the egg yolks and beat them until stiff. Mix egg yolks with powdered sugar until a foamy mixture is formed. With a spoon, gradually add egg whites to the other ingredients and stir until they get well combined. Then, gradually add strained flour and stir again until smooth. Pour the biscuit into the baking tray and bake at 180 degrees for 25-30 minutes. Once the biscuit is baked, let it cool. Then break it into as small pieces as possible (I use a chopper for that). Preparation of biscuit additions and shaping balls: In a separate bowl with a hand mixer mix together Nutella, Mascarpone cheese and boiled, ground and chilled raspberries. Add the chopped biscuit to this mixture and stir until ingredients get well combined. Check if the mass is juicy enough. If not, add more wet ingredients. Place the mass in the refrigerator for a few hours. Once the mass has cooled, take it out of the fridge and form balls (of 50g/ball) out of it with an extension that will be placed in the cone. Take 50g of chocolate drops and melt them in the microwave. Spread them on the inside of the cones with the opposite side of the teaspoon and immediately place the balls, with the extension downwards, into them. Once the balls are standing in the cones, place them into the stand and in the fridge for an hour. Chocolate dipping: Melt the chocolate drops in the microwave. Make sure you put the chocolate in a suitably deep bowl, as this will make dipping much easier. Place the cones out of the fridge and dip one by one in the melted chocolate and let the excess chocolate drain off (you can fasten this process by tapping the cone lightly with your fingers). Return the dipped cones to the stand and start decorating immediately afterwards, as the decorations on the hardened chocolate will not adhere well. Decoration: Decorate the cones as per your taste. I really like to use dried edible flowers and sugar pearls of different colors and sizes. Once the cones are decorated, place them in the refrigerator and wait a few hours for them to harden completely. While melting the chocolate in the microwave oven, set the time to 30 seconds and take the bowl out of the oven every 30 seconds, mix the chocolate well before placing it back in the microwave. Repeat until the chocolate is completely melted.Ingredients
Instructions
Notes
And it already smells like Christmas! Delicious roasted almonds, topped with white chocolate and coconut. Also a great idea for a New Year gift. Preheat oven to 160 degrees. Arrange the almonds evenly on baking paper and place them in a preheated oven for about 10 minutes. Meanwhile, in a kitchen plastic storage container, mix in coconut flour, vanilla sugar and powdered sugar. Melt white chocolate over steam and pour it over roasted almonds. Stir everything with a spatula. Once well combined, place almonds into the storage container with flour and sugar and close it with the lid. Shake thoroughly. Take almonds out of the storage container and sprinkle them on baking paper. There separate them with the help of a fork and put them in the cold for half an hour to allow the chocolate to harden. When the almonds are well chilled, serve them in a cup and serve.RAFFAELLO ROASTED ALMONDS
Ingredients
Instructions
This Oreo cheesecake tastes heavenly and its preparation is easy. If you love Cheesecakes and Oreo cookies, the recipe below is right for you. Cookie base: Using a food chopper, finely crush the Oreo cookies and add a pinch of salt. Melt the butter and with the help of a hand mixer mix it into the cookie mass so that the ingredients combine well with each other. Prepare a baking tray of 25 cm, then cover the bottom of the model with baking paper. Using a glass, press the prepared mass against the base and distribute it evenly. Place the baking tray in the refrigerator for a few minutes. Meanwhile, bring the oven to 180 degrees, then bake for about 10 minutes and take the baking tray out of the oven. Mascarpone cream: Using a hand mixer, gently stir in mascarpone, sour cream, powdered sugar and vanilla paste. Stir until the ingredients blend well together. Pour the sweet whipping cream into a separate bowl. Start whisking at low speed, then increase the speed to medium-high until the mixture thickens. Add whipped cream to the cream cheese mixture and mix gently. Spread 1/2 of the cream evenly over the cookie base, then spread the Oreo crumbs over the cream layer and add the other half of the cream on top. Place the baking tray in the refrigerator for a few hours or overnight. Ganache: I was inspired to create the “Zebra” ganache by Preppy Kitchen. Start preparing the ganache the next day, when the cake has cooled down well. Repeat the method, once with white and the second time with dark chocolate. Chop the chocolate with a knife. Heat the sweet cream slowly over medium heat until boiling. Set the cream aside and pour over the chopped chocolate. Wait 1-2 minutes, then start mixing until the ingredients combine and the mixture becomes completely smooth. Pour white chocolate ganache on the cooled cake, then add spoons of dark chocolate and use a toothpick to create patterns of any shape. Place in the refrigerator for a few hours to allow ganache to harden. Decoration: Whip the sweet cream and add powdered sugar to it, somewhere in the first third of the whipping. Put the cream in a piping bag. Decorate the cake edge with a piping nozzle of choice and add whole Oreo cookies in between. Last but not least, sprinkle with Oreo crumbs and serve.OREO CHEESECAKE
Ingredients
Instructions
Sift the flour and mix it with salt and coconut sugar. Add the rest of the dough ingredients and mix everything together so a smooth mass is formed (I do this in a food processor - I use a nozzle/hook for kneading dough). When a smooth mass is formed and it deviates from the base line, take it out with your hands and knead slightly. Take about 1/4 of the dough and form two separate balls (one from the 1/4 of the dough, the second from the remaining 3/4). Wrap them separately in a transparent foil and place in the fridge for 45 minutes. Preheat the oven to 180 degrees. Grease the pie model with vegan margarine. Wash, peel, grate and squeeze the apples. Add agave syrup, rice milk, cinnamon and vanilla paste and mix with a whisk so that the ingredients get well combined. Set the mixture aside. Roll out the larger dougher ball thin and carefully roll it over the top of the model. Then press it against the bottom with your fingers and remove the excess part, which looks over the edge of the model. By using a fork, prick the dough over the entire surface, including the edges. Spread the apple filling evenly over the dough. Then roll out the rest of the dough and cut it into strips. Place them on top of the pie by forming grates from them. Bake for about 40-50 minutes (depending on the power of your oven). The pie is baked when the edges turn golden-brown (when the dough “crunches”) and the apples soften well. In my opinion, the pie is best eaten warm, but I recommend you to wait for it to cool down so it can be cut easier.VEGAN APPLE PIE
Ingredients
Instructions
Pour the sugar, vanilla sugar, cinnamon and water into the pan and bring to a boil. Reduce the heat to medium-high and add almonds. With occasional stirring, allow the water to slowly evaporate and the sugar to turn into a granular, sand-like structure. When the structure has already thickened (just before the granular structure is formed - when the water has almost completely evaporated), start mixing it constantly. In the meantime, you can increase the intensity of the fire a little, but be careful not to burn the almonds. Stir until the sugar is slightly caramelized (the almonds get the typical "shine effect"). When all the almonds are caramelized, remove the pan from the stove and put the almonds on the prepared baking paper. Separate the almonds with a fork and leave to cool (approx. 30 minutes). Enjoy!CINNAMON-ROASTED ALMONDS
Ingredients
Instructions
I did some baking after a really long time. It felt so good, and the result was even better. Find below the recipe for a truly delicious pear cheesecake. Preheat oven to 180 degrees. Melt the butter in the shrimp. Set the shrimp aside and wait for the butter to cool slightly. Using a rolling pin, grind the Albert cookies. Place them in a bowl and add sugar to them. Knead the mixture well with melted butter and push it against the bottom of the cake pan. Place the model in a preheated oven for 8 minutes. Take the model out of the oven and allow the biscuit base to cool to room temperature. Whisk the egg whites until stiff. Beat the sugar and egg yolks together until you get a fluffy mixture. Stir in the cream cheese and finally add the egg whites. Peel the pears, wash them and remove the seeds. Cut 1 pear into thin layers and spread it over the biscuit base. Pour the cream over. Place the model in the oven for 20 minutes. Once done, allow the cream to cool down. Soften the remaining pears by heating them over steam. Using a stick mixer, whisk them into a smooth mixture. Add soaked gelatin sheets and powdered sugar. Stir the mixture thoroughly and allow to cool. Pour it over the cream and sprinkle with almond flakes. Place the cake in the refrigerator overnight. To make it even better, sprinkle it with Chai Moment spice from Kotanyi that consists of cardamom and cinnamon. A great way to spice up the taste of the cake. Bon Appetit!PEAR CHEESECAKE
Ingredients
Instructions
Basis: Soak hazelnuts and dates in water for at least a few hours. Drain and wipe them with a towel. Cut the dates into small pieces and grind them together with the hazelnuts with a blender. Stir in melted coconut fat, banana, oatmeal and rice milk. Place the resulting mixture in a cake model of 26 cm and spread it evenly over the model’s surface. Preheat the oven to 180 degrees and bake for about 20 minutes. Cream: In the meantime, prepare the cream. Grind cashews and almonds in an electric mixer to form a finely ground flour. Add peeled and sliced strawberries, coconut flour, maple syrup, vanilla paste, rice milk and melted coconut fat. Mix everything together in a blender until the cream gets smooth. Spread the cream evenly over the first layer. Place the cake model into the refrigerator overnight for the cream to harden. Topping: Prepare the chocolate topping for strawberries by melting the chopped chocolate in a pan over steam and adding rice milk. Dip the strawberries in the resulting topping. Wait a few seconds for the excess topping to drain, then place them on a baking paper. Once the topping has cooled, place the strawberries on a plate and store them in the refrigerator to harden. In the morning, decorate the cake with fresh and chocolate strawberries and almond flakes.Ingredients
Instructions