All Posts By:

katy

HEALTHY MAIN COURSES

CHILI CON CARNE

Don’t you just love Mexican food?

CHILI CON CARNE

1 Star2 Stars3 Stars4 Stars5 Stars (No Ratings Yet)
Loading...
Lunch Mexican
By Katarina Serves: For 3-4 people
Prep Time: 30 minutes Cooking Time: 2 hours Total Time: 2,5 hours

Ingredients

  • 500g minced ground beef
  • 2 medium sized onions
  • 3 garlic cloves
  • 1 stalk of green
  • 1 oblong red pepper
  • 1 can of tomatoes in pieces
  • 1 tablespoon tomato concentrate
  • 1dcl of red wine
  • 3dcl beef soup base
  • 160g canned corn
  • 230g canned red beans
  • Spices:
  • 2 teaspoons smoked ground paprika
  • 2 teaspoons spice mixture for chili con carne
  • Ground chili (to taste)
  • Salt
  • Pepper
  • Vegetable oil

Instructions

1

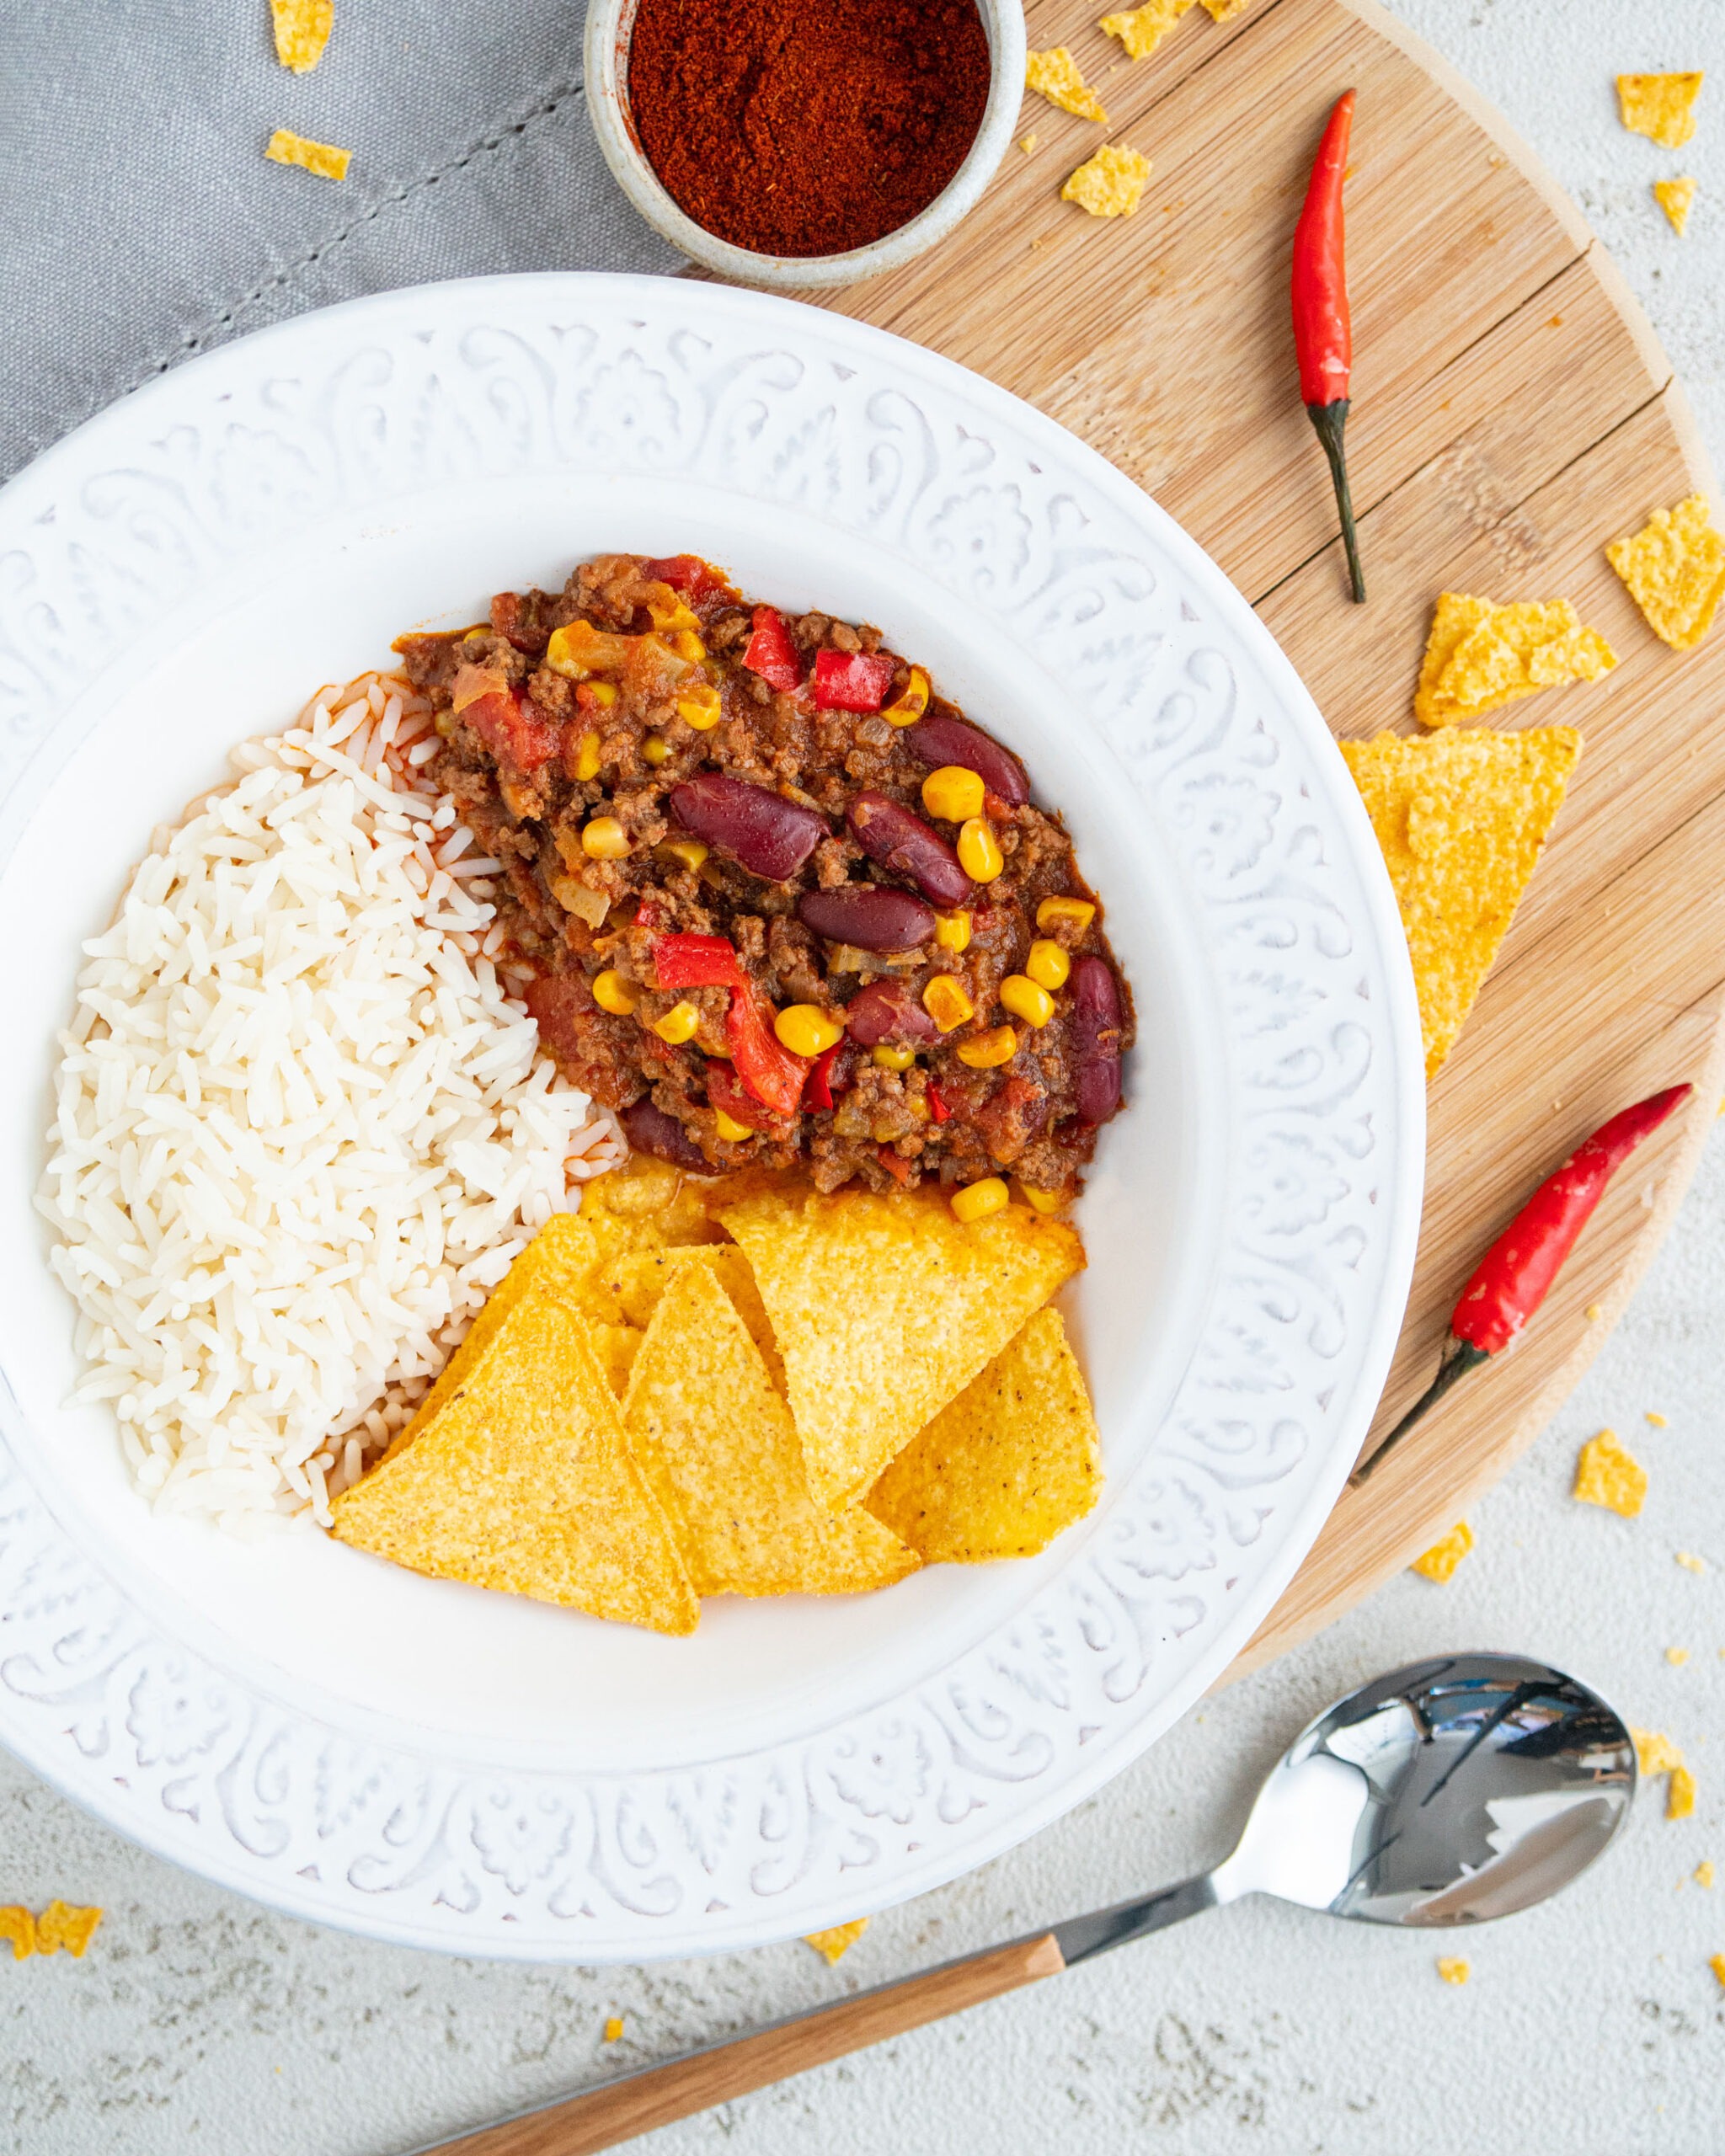
Peel the onion and garlic and rinse under running water. Together with the greens, chop all three separately.

2

Heat the vegetable oil in a medium-sized pot and fry the onion on it for a few minutes to soften. Add the chopped garlic and greens and fry for a few more minutes.

3

Season with smoked paprika and a mixture of spices for chili con carne.

4

Add the minced meat and roast it until it turns brown.

5

Pour the beef soup base and red wine into the mixture and let it boil. Reduce heat to a simmer.

6

Wash the red paprika and cut it into small pieces. Add it to the meat, along with the diced tomatoes and concentrate. Season with pepper, salt and ground chili.

7

Cover the chili con carne sauce with a lid and cook it for about an hour and a half, meanwhile stir it well several times.

8

Wash the beans and corn under running water and drain them.

9

After 1.5 hours of cooking, add them to the meat pot and let it all cook for about half an hour.

10

Serve chili con carne in a soup plate. You may also want to serve it together with rice or corn tortillas.

HALLOWEEN/ HOLIDAY DISHES

DRACULA TEETH

Dracula teeth

1 Star2 Stars3 Stars4 Stars5 Stars (No Ratings Yet)
Loading...
Dessert Halloween
By Katarina Štucl Serves: 6
Prep Time: 10 minutes Cooking Time: / Total Time: 10 minutes

If you love creating with your kids for Halloween, the below recipe is perfect for you. Ready in ten minutes and an original idea to put on a table 🙂

Ingredients

  • 36 mini white Marshmallows
  • 1dcl whipping cream
  • Few drops of red food color
  • 3 peeled almonds
  • 6 cookies of choice (bigger and flat)
  • Optional: 1 tsp sugar

Instructions

1

Cut the cookies in half.

2

In a large bowl, whip cream with a few drops of red food color until stiff peaks are just about to form (you may also add some sugar to the cream while whipping).

3

Spread a thin layer of the red cream onto each cookie half.

4

Place mini white marshmallows around the round edges of both sides of the cookies.

5

Last but not least stick one fourth of a peeled almond on each side to create the typical Dracula fangs.

OTHER DESSERTS

OREO CHEESECAKE

OREO CHEESECAKE

1 Star2 Stars3 Stars4 Stars5 Stars (No Ratings Yet)
Loading...
Desserts
By Katarina Serves: 16
Prep Time: 30 minutes Cooking Time: 10 minutes Total Time: 40 minutes + cooling time

This Oreo cheesecake tastes heavenly and its preparation is easy. If you love Cheesecakes and Oreo cookies, the recipe below is right for you.

Ingredients

  • Accessories:
  • - round baking tray of 25 cm
  • - piping bag
  • - piping nozzles
  • - toothpick
  • Cookie base:
  • - 275g Oreo crumbs
  • - 150g butter
  • - 1 pinch of salt
  • Mascarpone cream:
  • - 800g mascarpone cheese
  • - 150g powdered sugar
  • - 200g sour cream
  • - 200ml sweet whipping cream
  • - 120g Oreo crumbs
  • - 3 teaspoons of vanilla paste
  • Ganache:
  • - 200g of white chocolate
  • - 80ml sweet whipping cream
  • - 30g dark chocolate
  • - 30ml sweet whipping cream
  • Decoration:
  • - 10 Oreo cookies
  • - 50g Oreo crumbs
  • - 150ml sweet whipping cream
  • - 20g powdered sugar

Instructions

Cookie base:

1

Using a food chopper, finely crush the Oreo cookies and add a pinch of salt. Melt the butter and with the help of a hand mixer mix it into the cookie mass so that the ingredients combine well with each other. Prepare a baking tray of 25 cm, then cover the bottom of the model with baking paper. Using a glass, press the prepared mass against the base and distribute it evenly. Place the baking tray in the refrigerator for a few minutes. Meanwhile, bring the oven to 180 degrees, then bake for about 10 minutes and take the baking tray out of the oven.

Mascarpone cream:

2

Using a hand mixer, gently stir in mascarpone, sour cream, powdered sugar and vanilla paste. Stir until the ingredients blend well together. Pour the sweet whipping cream into a separate bowl. Start whisking at low speed, then increase the speed to medium-high until the mixture thickens. Add whipped cream to the cream cheese mixture and mix gently. Spread 1/2 of the cream evenly over the cookie base, then spread the Oreo crumbs over the cream layer and add the other half of the cream on top. Place the baking tray in the refrigerator for a few hours or overnight.

Ganache:

3

I was inspired to create the “Zebra” ganache by Preppy Kitchen. Start preparing the ganache the next day, when the cake has cooled down well. Repeat the method, once with white and the second time with dark chocolate. Chop the chocolate with a knife. Heat the sweet cream slowly over medium heat until boiling. Set the cream aside and pour over the chopped chocolate. Wait 1-2 minutes, then start mixing until the ingredients combine and the mixture becomes completely smooth. Pour white chocolate ganache on the cooled cake, then add spoons of dark chocolate and use a toothpick to create patterns of any shape. Place in the refrigerator for a few hours to allow ganache to harden.

Decoration:

4

Whip the sweet cream and add powdered sugar to it, somewhere in the first third of the whipping. Put the cream in a piping bag. Decorate the cake edge with a piping nozzle of choice and add whole Oreo cookies in between. Last but not least, sprinkle with Oreo crumbs and serve.

EASTER

SILK DYED EASTER EGGS

SILK DYED EASTER EGGS

1 Star2 Stars3 Stars4 Stars5 Stars (No Ratings Yet)
Loading...

I took Martha Stewart as an example in this technique. Easter eggs, colored in this way, are gorgeous, and the preparation is fairly easy and quick. Given that there are so many different silk patterns, we have a really free hand with this technique and can dye the eggs in countless ways. It is not recommended to eat Easter eggs dyed with silk, as the dye from the silk passes into the inside of the egg. Therefore, rather than for food, use them for home decoration. Some useful tips: Always choose white eggs. They are even better bought than homemade (they absorb more color) Choose darker colors of silk (pastel and gray will turn out the worst on the egg - you will barely be able to see the pattern) Small patterns are more noticeable than the larger ones It is better to choose a thicker than a thinner piece of silk, because the color will be more intense and the patterns will be better reflected on the egg

Ingredients

  • Bleached eggs
  • White wine / apple cider vinegar
  • Oil
  • Cord / elastic
  • Silk (for one egg 20x20cm of fabric)
  • White cotton cloth (I used a tetra diaper)

Instructions

1

Wrap the raw white egg tightly in a piece of silk so that the more intensely colored side is facing the egg.

2

Dip the still untied egg in cold water so that the fabric adheres well to the eggshell.

3

Tie the fabric tightly with an elastic band.

4

Then wrap the egg in white cotton (in this case do not wrap the egg tightly because it can crack) so that the dye does not spill on the other eggs.

5

Pour cold water into the pot, add two tablespoons of vinegar and bring to a boil.

6

Cook the eggs over a moderate heat for another 25-30 minutes. The longer you cook them, the more intense the color imprint on the shell will be.

7

Remove them from the water and leave them wrapped in silk for another 30 minutes to cool completely.

8

Then unwrap them and coat with cooking oil to make them glow.

HEALTHY MAIN COURSES

SHRIMP AND TOFU PAD THAI

SHRIMP AND TOFU PAD THAI

1 Star2 Stars3 Stars4 Stars5 Stars (No Ratings Yet)
Loading...
Main dish Asian
By Katarina Serves: 2

Ingredients

  • Accessories:
  • Wok
  • Serving tongs
  • Base:
  • 200g rice noodles
  • 100g shrimps
  • 60g tofu
  • 2 tablespoons olive oil
  • 1 egg
  • 100g bean sprouts
  • 30g leek (green part)
  • 1 garlic clove
  • 2 tablespoons crushed peanuts (unsalted)
  • Sauce:
  • 6 tablespoons fish sauce
  • 2 tablespoon rice vinegar
  • Juice of 1 lime
  • 3 teaspoons brown sugar
  • 4 tablespoons soy sauce
  • A pinch of red pepper

Instructions

1

To prepare the rice noodles, follow the instructions on the package that the noodles came in.

2

Peel the garlic and chop it. Cut the tofu into evenly sized cubes. Crush the peanuts. Wash the shrimps under cold water.

3

Prepare Pad Thai sauce in a separate bowl by mixing all the ingredients for the sauce together.

4

Swirl or drizzle the oil into a pre-heated wok, add the garlic, diced tofu and shrimps and fry for couple of minutes.

5

Then move everything to one side of the pan and make a fried egg on the other side.

6

When it coagulates (after approx. 25-30 seconds), mix it lightly with the help of serving tongs, and then incorporate with the other ingredients. Drain the noodles and add them to the pan.

7

Add the bean sprouts and leeks (cut into thin strips, 4-5 cm long) and mix until they soften.

8

Finally, pour in the sauce and crushed peanuts and stir again so everything gets well incorporated.

HEALTHY DESSERTS

VEGAN APPLE PIE

VEGAN APPLE PIE

1 Star2 Stars3 Stars4 Stars5 Stars (No Ratings Yet)
Loading...
Desserts Traditional
By Katarina Serves: 16
Prep Time: 45 minutes Cooking Time: 40-50 minutes Total Time: 1,5 hours + cooling time

Ingredients

  • Dough:
  • 350g all-purpose flour
  • 50g coconut sugar 
  • Pinch of salt
  • 200g vegan margarine
  • 4cl cold water
  • Filling:
  • 6 large red apples 
  • 40g agave syrup
  • 4cl rice milk
  • 2 teaspoons cinnamon
  • 1 tbs vanilla paste

Instructions

1

Sift the flour and mix it with salt and coconut sugar.

2

Add the rest of the dough ingredients and mix everything together so a smooth mass is formed (I do this in a food processor - I use a nozzle/hook for kneading dough).

3

When a smooth mass is formed and it deviates from the base line, take it out with your hands and knead slightly. Take about 1/4 of the dough and form two separate balls (one from the 1/4 of the dough, the second from the remaining 3/4). Wrap them separately in  a transparent foil and place in the fridge for 45 minutes.

4

Preheat the oven to 180 degrees.

5

Grease the pie model with vegan margarine.

6

Wash, peel, grate and squeeze the apples. Add agave syrup, rice milk, cinnamon and vanilla paste and mix with a whisk so that the ingredients get well combined. Set the mixture aside.

7

Roll out the larger dougher ball thin and carefully roll it over the top of the model. Then press it against the bottom with your fingers and remove the excess part, which looks over the edge of the model. By using a fork, prick the dough over the entire surface, including the edges.

8

Spread the apple filling evenly over the dough.

9

Then roll out the rest of the dough and cut it into strips. Place them on top of the pie by forming grates from them.

10

Bake for about 40-50 minutes (depending on the power of your oven). The pie is baked when the edges turn golden-brown (when the dough “crunches”) and the apples soften well. In my opinion, the pie is best eaten warm, but I recommend you to wait for it to cool down so it can be cut easier.

Christmas / New Year/ OTHER DESSERTS

CINNAMON-ROASTED ALMONDS

CINNAMON-ROASTED ALMONDS

1 Star2 Stars3 Stars4 Stars5 Stars (No Ratings Yet)
Loading...
Desserts Holiday
By Katarina Serves: 1-2
Prep Time: 20 minutes Total Time: 20 minutes + cooling time

Ingredients

  • 100g sugar
  • 1 vanilla sugar
  • 1 teaspoon cinnamon
  • 50ml water
  • 100g almonds
  • (You may also add a pinch of nutmeg)

Instructions

1

Pour the sugar, vanilla sugar, cinnamon and water into the pan and bring to a boil.

2

Reduce the heat to medium-high and add almonds.

3

With occasional stirring, allow the water to slowly evaporate and the sugar to turn into a granular, sand-like structure.

4

When the structure has already thickened (just before the granular structure is formed - when the water has almost completely evaporated), start mixing it constantly.

5

In the meantime, you can increase the intensity of the fire a little, but be careful not to burn the almonds. Stir until the sugar is slightly caramelized (the almonds get the typical "shine effect").

6

When all the almonds are caramelized, remove the pan from the stove and put the almonds on the prepared baking paper.

7

Separate the almonds with a fork and leave to cool (approx. 30 minutes). Enjoy!

DESSERTS/ OTHER DESSERTS

PEAR CHEESECAKE

PEAR CHEESECAKE

1 Star2 Stars3 Stars4 Stars5 Stars (No Ratings Yet)
Loading...
Desserts
By Katarina Serves: 16

I did some baking after a really long time. It felt so good, and the result was even better. Find below the recipe for a truly delicious pear cheesecake.

Ingredients

  • Accessories:
  • A baking tray of 25cm
  • Base:
  • 200g Albert biscuits
  • 2 tablespoons sugar
  • 100g butter
  • Cream:
  • 500g cream cheese
  • 4 tablespoons sugar
  • 3 eggs
  • 1 vanilla sugar
  • 1 ripe pear
  • Topping:
  • 4 ripe pears
  • 3 sheets of gelatin
  • 1 tablespoon powdered sugar
  • 100g almond flakes
  • Spices: Chai Moment

Instructions

1

Preheat oven to 180 degrees.

2

Melt the butter in the shrimp. Set the shrimp aside and wait for the butter to cool slightly.

3

Using a rolling pin, grind the Albert cookies. Place them in a bowl and add sugar to them.

4

Knead the mixture well with melted butter and push it against the bottom of the cake pan.

5

Place the model in a preheated oven for 8 minutes.

6

Take the model out of the oven and allow the biscuit base to cool to room temperature.

7

Whisk the egg whites until stiff. Beat the sugar and egg yolks together until you get a fluffy mixture. Stir in the cream cheese and finally add the egg whites.

8

Peel the pears, wash them and remove the seeds. Cut 1 pear into thin layers and spread it over the biscuit base.

9

Pour the cream over.

10

Place the model in the oven for 20 minutes. Once done, allow the cream to cool down.

11

Soften the remaining pears by heating them over steam. Using a stick mixer, whisk them into a smooth mixture. Add soaked gelatin sheets and powdered sugar. Stir the mixture thoroughly and allow to cool.

12

Pour it over the cream and sprinkle with almond flakes.

13

Place the cake in the refrigerator overnight. To make it even better, sprinkle it with Chai Moment spice from Kotanyi that consists of cardamom and cinnamon. A great way to spice up the taste of the cake. Bon Appetit!

DESSERTS/ HEALTHY DESSERTS

HEALTHY STRAWBERRY CAKE

1 Star2 Stars3 Stars4 Stars5 Stars (No Ratings Yet)
Loading...
Desserts Vegan
By Katarina Serves: 16

Ingredients

  • Basis:
  • 3 tablespoons of oat flour
  • 50g of ground hazelnuts
  • 50g of coconut fat
  • 1/2 of banana
  • 70g of dates
  • 1 dcl of rice milk
  • Cream:
  • 50g of finely ground coconut flour
  • 100g of cashew nuts
  • 100g of almonds
  • 400g of fresh strawberries
  • 40g of coconut fat
  • 3 tablespoons of maple syrup
  • 1 teaspoon of vanilla paste
  • 1.5 dcl of rice milk
  • Topping:
  • 350g of fresh strawberries (100g are for chocolate)
  • 85g of chocolate without added sugar
  • 4cl of rice milk
  • Almond flakes

Instructions

Basis:

1

Soak hazelnuts and dates in water for at least a few hours. Drain and wipe them with a towel. Cut the dates into small pieces and grind them together with the hazelnuts with a blender. Stir in melted coconut fat, banana, oatmeal and rice milk. Place the resulting mixture in a cake model of 26 cm and spread it evenly over the model’s surface. Preheat the oven to 180 degrees and bake for about 20 minutes.

Cream:

2

In the meantime, prepare the cream. Grind cashews and almonds in an electric mixer to form a finely ground flour. Add peeled and sliced ​​strawberries, coconut flour, maple syrup, vanilla paste, rice milk and melted coconut fat. Mix everything together in a blender until the cream gets smooth. Spread the cream evenly over the first layer. Place the cake model into the refrigerator overnight for the cream to harden.

Topping:

3

Prepare the chocolate topping for strawberries by melting the chopped chocolate in a pan over steam and adding rice milk. Dip the strawberries in the resulting topping. Wait a few seconds for the excess topping to drain, then place them on a baking paper. Once the topping has cooled, place the strawberries on a plate and store them in the refrigerator to harden. In the morning, decorate the cake with fresh and chocolate strawberries and almond flakes.

MAIN COURSES/ OTHER MAIN COURSES

MEAT LASAGNA

MEAT LASAGNA

1 Star2 Stars3 Stars4 Stars5 Stars (No Ratings Yet)
Loading...
Main dish Italian
By Katarina Serves: 3-4 people
Prep Time: 30 minutes Cooking Time: 30-35 minutes Total Time: 1 hour + cooling time

Whenever I hear someone mention lasagna, I remember Garfield. To me, lasagna is one of my favorite sinful lunches. See the below recipe and try the best lasagna ever.

Ingredients

  • Accessories:
  • Rectangular baking tray (32x20cm)
  • 500g of ground beef
  • 2 medium onions
  • 5 medium garlic cloves
  • 400g of steamed tomatoes (app. 4 smaller tomatoes)
  • 1/2 of beef bouillon cube
  • 200g of grated mozzarella
  • 200g of young grated cheese
  • Lasagna dough (15 sheets)
  • 100g of sour cream
  • 1 egg
  • 0,5l béchamel
  • Spices: olive / vegetable oil, salt, pepper, ground red pepper, herbs/spices de Provence, oregano

Instructions

1

Peel the onion and garlic, wash, finely chop and fry in olive oil to glaze.

2

Add the minced meat and fry until it turns brown. Then mix in 1/2 of the beef cube.

3

Wash the tomatoes and cut them into smaller pieces. Using a blender, mix them until sauce is formed. Pour the sauce into minced meat.

4

Season to taste by adding salt, pepper, ground red pepper, provencal spices and oregano.

5

In a bowl, mix together the grated mozzarella and young cheese.

6

Grease the baking tray in which you will make lasagna with vegetable oil.

Start to form the layers in the following sequence:

7

Note: I made two such layers. It is important that the last top layer is the dough again.

8

Dough sheets (if the dough is dry, cook it in salted water for about 3 minutes - when the water boils, reduce the strength to moderate and add the sheets. I used 5 sheets of dough for one layer. Note: When forming the layers, leave the remaining sheets in boiling water so that they do not stick together),

9

Meat sauce,

10

Béchamel,

11

A mixture of grated cheese.

12

Last but not least, spread the mixture of sour cream and egg on the dough.

13

Preheat the oven to 200 degrees and put the lasagna in the oven for about 30-35 minutes. Be careful not to burn the top layer.

14

Once the lasagna is baked, cool it slightly and serve with homemade sour cream.